Phone as a mobile computer (handheld scanner): getting started
A handheld terminal (mobile computer) is a scanner with a screen that warehouse staff use to receive goods, count stock and pick orders. You don't have to buy one: the Warehouse / Handheld module turns any staff or owner smartphone into it. The phone scans, keeps working without the internet, and a manager in the browser sees its work live and posts the documents.
The scanner mode is included in inventory at no extra cost. It is a new feature in beta: it has been tested on Android smartphones; on iPhone it has so far only been verified as a build.
What the phone scanner is#
| Where | Who | What |
|---|---|---|
| Team app (Android, iPhone) | stock keeper, buyer, sales assistant, picker | the "Warehouse / Handheld" mode: operations allowed by the role |
| Business app (Android, iPhone) | owner | the same module: on Android — "Warehouse / Handheld", on iPhone — the warehouse terminal tile |
Browser: Inventory → 📱 Scanner (admin.cenaly.ge/inventory/tsd) |
owner, manager | phone sessions, posting, discrepancy report, tasks, log and KPIs, settings |
Every piece of work on a phone is a session — a shared draft document on the server. Several phones can scan into the same receiving or stocktake at once. Until the session is posted, stock does not change; "Post" turns it into an ordinary inventory document.
What you need to start#
| What | Why |
|---|---|
| The Inventory section and at least one warehouse at the location | the phone works with a warehouse: catalog, stock, documents |
| Items with barcodes | the phone finds an item by its barcode; an unknown code can be attached to an item right from the phone |
| A staff member with a role that includes inventory and a login (Staff) | rights on the phone are the role's rights; "Stock keeper" records but does not post |
| An Android 8+ smartphone or an iPhone (iOS 16+) with the Team or Business app | the camera is already a scanner; for volume — a Bluetooth scanner or an Android handheld |
| Optional: a label printer | price and shelf labels from the phone over Wi-Fi/Bluetooth or through a computer with the bridge |
Step 1. Warehouse and staff#
- In Inventory, create the location's warehouse and items (or import the catalog). Item barcodes live in the item card.
- In Staff, add an employee with a login and the "Stock keeper" role (or your own role with inventory access).
- Decide who will post: the owner, a manager, or a role with the "Post stocktake" ability. By default a stock keeper only records and submits.
Step 2. Turn on the scanner mode on the phone#
- Android, Team: sign in → mode selection → "Warehouse / Handheld" (or the chip in the app settings).
- Android, Business: the "Warehouse / Handheld" card in mode selection or the icon in the header.
- iPhone, Team: the "Warehouse / Handheld" mode; iPhone, Business: the warehouse terminal tile (mode selection or the "Account" tab).
The handheld interface follows the phone language.
Pick a warehouse — the phone downloads a copy of the catalog, prices and stock. The home screen shows operation tiles, your own and open sessions, and a freshness badge for the copy. An operation you can't use is shown greyed out with the reason: no permission, turned off in the warehouse settings, bin locations required.
If you connect an external scanner, run the "Scanner check" wizard on the home screen (Android): it checks that the whole code comes through. More in Which scanner to choose.
Step 3. Your first receiving#
- The "Receiving" tile → basis: purchase order (there will be a plan), invoice photo, or no document.
- Scan items: each scan is +1 (or the phone asks for the quantity — a warehouse setting). You can type the quantity or receive by packs.
- Against an order you see plan versus actual: waiting, short, matched, over, "not in the order", unknown code.
- For items with a shelf life, the phone takes the lot and expiry from the GS1 barcode or asks for them.
- Need a second person? "Receive together": the second phone scans the session QR and writes into the same receiving.
- "Submit" sends the session for review. If you have the right — "Post" straight from the phone.
For deliveries in boxes, select “In packs” and check “1 pack = …” before entering quantities. For example, 2 boxes of 6 × 0.75 L bottles mean 12 bottles; the item card's unit must match the delivery's accounting unit. Create the supplier order in the web panel; the phone receives against an existing order.
One delivery for several orders. If the supplier has another open order for this warehouse, the phone shows “More orders from this supplier”. Tick the orders in this delivery and tap Start receiving. The plans add up, and on posting each order gets its own receipt. Pick the orders before the first scan: you can't add one to a receiving already under way.
A substitute arrived. Scan the item. If it isn't in the order and lines are still waiting, the phone asks whether it's a replacement. Choose the order line it replaces. Stock receives the delivered item at the order line's price, and the line closes. Scanning the same item again doesn't ask. No, it is an extra item keeps the line as extra. Blind receiving doesn't ask, because the plan is hidden there.
Part of the delivery goes to another warehouse. If the location has several warehouses, Receive to appears below the header. The chosen warehouse applies to the next lines. On posting, Cenaly creates a separate document for each warehouse and each order.
Differences from the order — the discrepancy report button (PDF).
Step 4. Review and post in the office#
Open Inventory → 📱 Scanner. The "Sessions" tab lists every receiving, transfer, stocktake and write-off from phones: status, participants, number of lines.
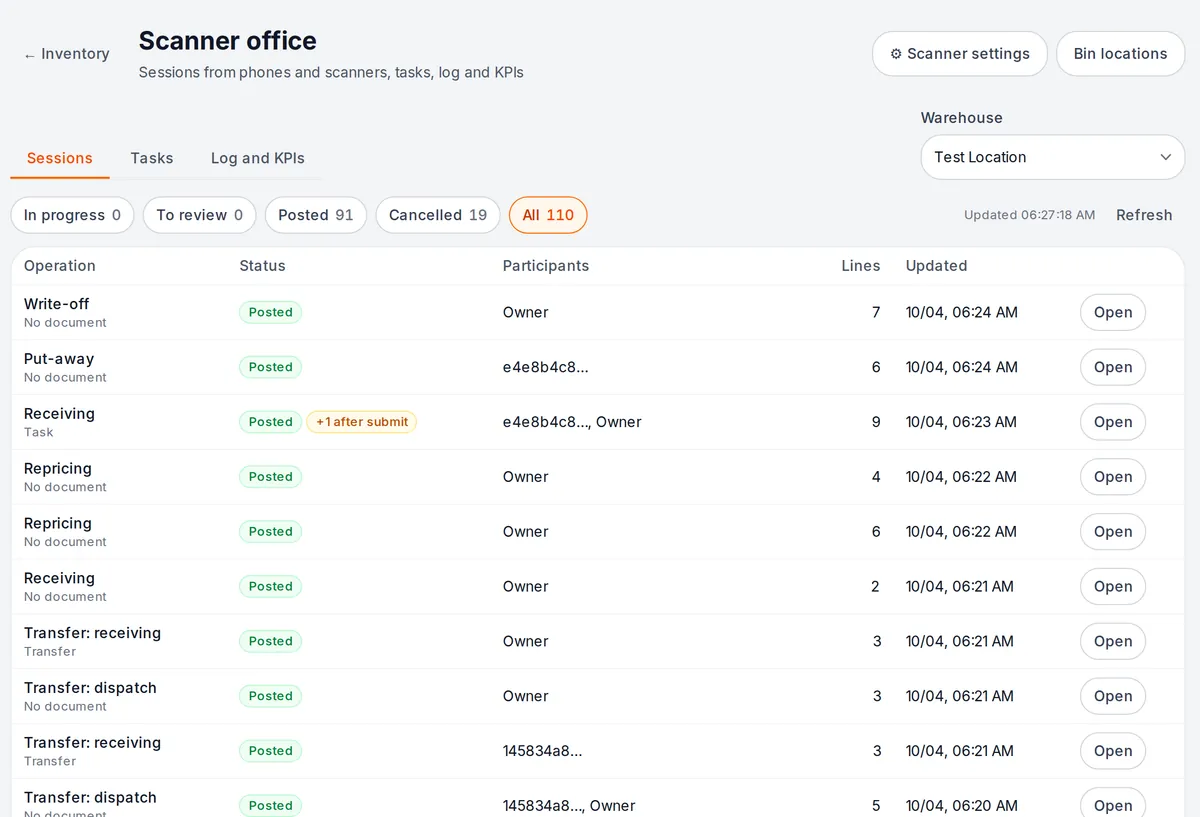
The session window shows plan versus actual, the line log (who, when, from which phone) and the participants. A live session refreshes every 5 seconds — you can watch the stock keeper scan. Buttons: "Post" (submitted sessions only), "Return to work", "Cancel", "Discrepancy report (PDF)". If new lines arrived from a phone after you opened the window, "Post" asks you to refresh — you post exactly what you saw.
Step 5. Configure the warehouse#
Inventory → 📱 Scanner → ⚙ Scanner settings. Settings are set for all warehouses, a location or a specific warehouse; the nearest level wins, and each field shows where its value comes from.
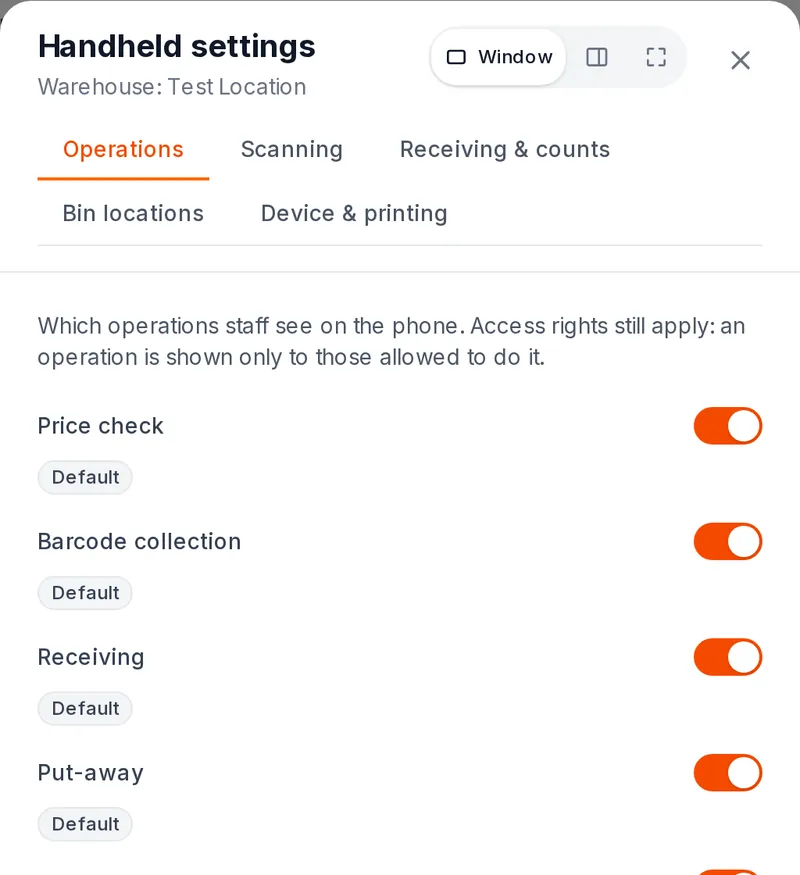
| Tab | Main options | Default |
|---|---|---|
| Operations | which operations the phone shows | all on |
| Scanning | +1 per scan or ask for quantity; weight barcodes | +1; prefixes 20–29, weight in the code |
| Receiving and counting | blind receiving; "more than ordered"; blind stocktake; photo on write-off; FEFO | off; warn; on; not required; warn |
| Bin locations | bin storage, mandatory bin scan, picking check by someone else | off; on; off |
| Device and printing | posting offline, sign-out on a shared phone, where to print | off; 5 min; the computer's print queue |
Only the owner and managers can change the settings. Role rights always win: a setting can only narrow what is allowed.
What else the phone can do#
| Operation | In short |
|---|---|
| Price check | scan → price, stock per warehouse, lots and expiry, bin |
| Barcode collection | unknown code → "New item" with a photo or "Add the barcode to a product"; a list of codes → CSV or into receiving |
| Transfer | after dispatch: “In transit”; at the destination warehouse, open “Incoming transfers”, check physical quantities and choose “Accept” or “Accept with discrepancies” |
| Write-off | built-in or custom reason on each line, photo above the amount set in settings, hint about expired lots |
| Return to supplier | supplier and the basis order, or without receiving |
| Butchery | a carcass → cuts with actual yield and loss; posted at once as a set of production documents (from the next app version) |
| Order from supplier | scan shelves → order lines → "Send": the server emails the supplier (Android; iPhone and Windows — from the next app version) |
| Stocktake | whole warehouse, categories, suppliers, bins or a list; several phones by zones; recount of discrepancies by another employee |
| Bin locations | put-away with a "where it already is" hint, moves between bins, "Find", stocktake by bins |
| Order picking | a pick list from orders "To ship", route by bins, scan of every item, packages, check, "Packed" in shipments |
| Repricing and labels | new price → "Apply prices" → print price labels; shelf price-label audit |
| Tasks | the office assigns a task, the employee gets a push and takes it; "My work" and reports on the phone |
Stocktaking on a phone#
Task: count a warehouse with several staff members and submit discrepancies for review.
- Open “Stocktake” in the correct warehouse. Under “What to count”, choose “Whole warehouse”, “Categories”, “Suppliers”, “Bins” or “Product list”. The product list supports searching by name.
- Tap “Start” and choose your zone, such as the refrigerator. To add a colleague, open “Session code”: they scan it on their phone's main screen to join the same session.
- On “Count”, scan a barcode or enter it manually, then enter the physical quantity. For an item without a barcode, start typing its name in the same field and pick it from the list (Android; iPhone and Windows — from the next app version).
- Review “Not counted”. Do not set zeros just to finish the list: zero means an item was checked and is absent.
- Someone with posting permission reviews “Differences” and, if allowed to assign tasks, uses “Send for recount”. Tasks appear under “Recount”; a different employee performs the check.
- Submit the session for review, or post it if your role allows it. In the office, open the session and “Discrepancy report (PDF)” to download a file for reviewing the result.
Blind counting is on by default: staff without posting permission do not see book quantities or differences. Someone who can post sees differences even in blind mode; with blind mode off, all session participants can see them. The owner or a manager changes “Blind stocktake” in the web panel under “Handheld settings → Receiving & counts”. The setting inherits from account to location to warehouse; the more specific value wins. The same tab has “Several counts of one item”: “Add up zones” for different shelves or “Last recount wins” for checking the same stock again.
A recognised item scanned outside the chosen scope is also counted, with a separate feedback signal. Check that it belongs to your warehouse. An unknown code does not create a product by itself.
Unknown barcode — “Link barcode” (Android; iPhone and Windows — from the next app version). After scanning an unknown code, a “Link barcode” button appears next to the message; you can return to recent unknown codes by tapping the “Unknown codes: 3 — they are sorted out in the office before posting” badge. Find the product by name and select it: the scan counts towards that product, and further scans of the same code go straight to it — no need to leave the count. The code is also saved to the product card if your role may create products while scanning, “Collect barcodes” is allowed in handheld settings and there is a connection. Otherwise the phone shows “Counted as «…»; the barcode is not saved to the catalog” with the reason — the link then applies to this stocktake only.
Result: one session combines staff contributions for the selected warehouse. A shared account catalog does not merge locations' stock: use a separate session for another warehouse. For preparation, paper sheets and posting a web count, see Stocktaking.
Barcode collection: add a code to a product#
Task: recognise a new barcode for an existing product without creating a duplicate item card.
- Open “Collect barcodes” and scan the unknown code.
- Tap the unknown code in the list and choose “Add the barcode to a product”.
- Search for the existing product by name and select it. Saving requires a connection.
- Return to the warehouse operation and scan again.
You need permission to create products while scanning; counting permission alone is not enough. The operation must also be allowed in handheld settings. If the button is unavailable, ask the owner to check the role and account, location and warehouse settings. The barcode is added to the account's shared product card, not just to the current count or warehouse.
Ordering from a supplier on the phone#
Task: walk the shelves, build an order by scanning and send it to the supplier without going to a computer. Available on Android; on iPhone and in Business for Windows — from the next app version.
- In the operations menu, open “Order from supplier” and choose a supplier. Below the name you see how the order will go: “The order will be emailed to the supplier”, or a warning that the supplier has no email and the order will be saved as a draft to send from the web admin.
- Scan products on the shelves or find them by name. Each scan adds the number from the “Quantity” field (1 by default) to the line; tap a line to correct its quantity.
- Add a comment for the supplier if needed.
- Tap “Send”. The order appears in the warehouse's supplier order register, and the server emails it to the supplier using the same template as orders from the web admin and auto-orders. “Save draft” creates the order without an email, so you can review and send it from the web admin.
The draft on the phone survives closing the app. Tapping again after a dropped connection does not create a second order or a second email. Sending needs a connection. You need permission to take part in warehouse operations (as for receiving), and “Order from supplier” must be allowed in “Handheld settings → Operations”.
Butchery on the phone#
Task: break down a carcass at the prep table and receive the cuts right away, without going back to a computer. It is the same operation as “Cutting” in the web panel: the same documents and the same cost split. Available on Android, iPhone and Business for Windows from the next app version.
- In the operations menu, open “Cutting”. Scan or search for what you are breaking down (for example, “Whole chicken”) and enter the quantity — 10 kg.
- If a cutting template is saved for this item in the panel, pick it: the cuts are filled in by the template's yield shares. Without a template, add cuts by scan or search: item → actual weight.
- Correct the actual yield of each cut. Below the list you see “Input · cuts · loss” — loss is counted over cuts in the same unit as the input. If the cuts weigh more than the input, “Post” is unavailable.
- You don't have to set a cost share: the input's money is then split by the weight of the cuts. Cuts that carry no money (bones to waste, trimmings) get a 0 % share.
- Tap “Post”. The server posts a set of production documents to the warehouse; stock updates within a few seconds. In the “Documents” feed the cutting shows as one row “🔪 Cutting”.
Cutting needs a connection. Tapping again after a dropped connection does not create a second set. You need the right to write stock documents at this warehouse (as for the web “Cutting” window), and the “Cutting” operation must be allowed in “TSD settings → Operations”. Templates are created and edited in the web panel.
App language#
By default the handheld app uses the phone's language. To pick another, tap the 🌐 icon on the handheld home screen and choose a language; “As on the phone” returns to the system language. The choice is stored on the device (Android; on iPhone — from the next app version). In Business for Windows there is one language for the whole app: choose it under “Account”, and the handheld screens follow it.
Without the internet#
Scans, lines and counts are kept on the phone and sent automatically when the connection is back; a badge shows how many are waiting. You can't post offline unless the warehouse allows "posting without network".
Limitations#
- Beta: on iPhone the module has only been verified as a build; on cenaly.ru the scanner mode on iPhone does not work yet (Android only).
- iPhone has no built-in scanner and no scanner-check wizard — use the camera or a Bluetooth scanner in keyboard mode.
- When picking, shortages and substitutions don't change the order contents — the order is edited by hand.
- Cutting on the phone takes one input at a time; cutting templates are managed only in the web panel, and there is no printed “cutting record” form yet (not on the web either).
- Custom write-off reasons reach the phone with the warehouse snapshot, so a new reason appears after the data refreshes. If one write-off mixes different reasons, posting creates a separate document for each reason, and the “Write-offs” summary shows them apart.
- Ordering from a supplier, name search and “Link barcode” during counting, and the handheld language choice arrive on iPhone and in Business for Windows with the next app version; until then use the web panel and “Collect barcodes” there.
- An order from the phone has one supplier and no prices — prices and terms come from the order register in the web panel.
- There is no full scanner app in the browser: the admin panel has a camera scanner on the inventory page and the office.
Troubleshooting#
| Symptom | What to check |
|---|---|
| An operation is missing or greyed out | the reason is on the tile: role permission, warehouse setting ("Operations"), bin locations |
| A stock keeper has no "Post" | by design: the owner, a manager or a role with "Post stocktake" posts |
| An item isn't found by scan | refresh the warehouse copy (button on the home screen); code not registered — "Add the barcode to a product" |
| The scanner beeps but no line appears | scanner and GS setup, the "Scanner check" wizard |
| “A stock count of these products is already open” | these products are already being counted on another phone or on the web. Post or cancel that count, then start again |
| Lines are "waiting to send" | no connection — they will go automatically; the "not accepted" list explains server refusals |
FAQ#
Do I need a dedicated handheld?#
No. Any Android 8+ or iPhone with a camera already reads barcodes and DataMatrix codes. For hundreds of items per shift a Bluetooth scanner or an Android handheld is more convenient.
How much does it cost?#
It is included in inventory at no extra cost.
Can two people receive one delivery?#
Yes: "Receive together" on the first phone, the second one scans the session QR. Repeats are never double-counted.
Related sections#
- Which scanner to choose
- Setting up the GS character
- Inventory — stock, documents, suppliers
- Mobile apps — Team and Business
- Staff and shifts — roles and logins
- Hardware and Cenaly Hardware Bridge — printers and printing through a computer
- Offline mode